Showing posts with label Crafts. Show all posts

Nursing Box: The Transition to Two

The transition to two is something I spent a lot of time thinking about and preparing for.  I had no idea what to expect, other than stories and advice from friends.  One close friend suggested the idea of a "Nursing Box."  She had been given one when she had her second, and loved it.  A nursing box is a collection of toys or games set aside only to be played with while mom is nursing the baby.  It is intended to help make nursing a fun time for the toddler (as opposed to time when mom is preoccupied with the newest member of the family).  Rather than toys, I chose to make some Montessori activities to fill our box.

This is a collection of links to the ideas I took inspiration from while making my box, as well as a review on how well they have occupied and entertained my toddler.  

One of the hardest parts about this project was anticipating which activities would be age appropriate for the time I needed them.  I made the activities about 3 months before I'd actually be using them so I had to guess what my toddler's skill level would be at that time.  I read a lot of reviews on different Montessori activities and took their word for it! 

Probably one of the more time-intensive activities I prepared is our Color Wheel.  I made a color wheel similar to this one using felt.  I wanted mine to be more versatile (be able to fold) so I opted for fabric rather than cardboard.  I have the six primary and secondary colors on one side and variations of black and white on the other, with clothespins to match every color.  My mind races when I think of all the variations on games we'll be able to use this for! 

I also made our first set of bean bags!  I am super excited about these.  There are so many games and activities to do with beanbags.  I debated how many to make and how big.  The size seems to be just about right (approximately the size of my palm) and for now we have 5.  We'll see if I end up making more.  (I filled mine with rice.)

Two things to know when making bean bags:
(1) You need less filling (rice or beans) inside than you think, and
(2) They double nicely as heating bags for sore muscles!

Along with the beans bags, I put six paper cups in the drawstring bag.  Not super surprisingly, Tagg likes playing with the cups as much (or more) than playing with the bags.  He will stack and unstack them countless times.  He's learning how to build them in to a pyramid.  I'm hopeful he'll grasp the concept of building a pyramid and then knocking it down with the bean bags soon!
Another entertaining element of our box is pom-poms.  I have pom-poms in the colors of the color wheel (above) to learn colors with.  Other pom-poms are in the box along with a water bottle to practice fine motor skills by stuffing them in the top one by one.  He loves the pom-poms.  He'll sort them in the cups (above) as well, over and over again.  
I also included a couple rolls of washi tape in our box.  Washi tape is the best kept secret entertainer.  A straight line on the floor is fun to walk on or drive cars on and a circle of tape on the floor is a target to throw bean bags in to.  Washi tape is a toddler's best friend at our house.

We're still figuring out how to work the Button Snake, but I think it's adorable.  Don't make the ribbon too long - extra length just gets in his way!  Along the same lines is the Felt Button Chain.  These both would be nice quiet activities for church.

This Cardboard Tube and Elastics doesn't entertain my toddler for as long as it does the creator's.  I think the unique shape and bright colors intrigue him to pick it up, but once he's pulled off all the elastics, it's done for.  Perhaps it will be different once he's figured out how to put them back on. 

Check out my Pinterest Board to see other ideas I gathered.  I plan to make more to add to the box as his skills develop! 


{Valentine's Day Gift}: Letters for Every Occasion


An easy homemade Valentine's Day gift that will bring a smile to anyone's face. Make a stack of these letters for your spouse, mother, best friend, or little brother - it's the perfect gift!


Cameron and I celebrated our first Valentine's Day as a married couple while we were still in school. We had been married almost 6 months, and I wanted to find the "perfect gift" to give him. Since we were both going to school full-time, I decided to go the homemade route and make him something out of paper.

Thus, "Letters for Every Occasion" was born.

The concept is simple. I labeled 20 envelopes with different life occasions, and filled them with notes, letters, pictures, treats - anything that would help Cameron smile during a given occasion. I made this gift for my husband, but it could easily be made for a mother, best friend, cousin, brother, etc. Basically, it's a heart-felt way to show anyone that you love them.


What you'll need:
- Envelopes*
- Things to put inside: Notes, pictures, quotes, treats, etc

*I made my own envelopes by using a real envelope as my stencil, and tracing it on to various patterned paper. Obviously, this route is more work, but it was cheaper than buying a new set of colored envelopes.

Now that you have your envelopes, it's time for the fun part - filling them! I made 20 total, and filled them with hand written notes, old pictures of him/us/me, memories, his favorite treats, inspiring quotes - you get the idea. I've listed some ideas below, but get creative here! Find a way to weave a favorite memory or picture in to your gift.

Open when...
- You need a good laugh
- You're having a bad day at work
- You need a smile
- You need a small treat
- You're having a bad hair day
- You can't sleep
- You're missin' me
- You could use a pep talk

I also used sticky mailing labels on the outside of the envelopes. I thought it looked most uniform, but it's definitely not necessary.


One of my favorite things about this gift is that it can last for a long time. When Cameron opened it, I told him there was one rule: he could only open one envelope a day. I wanted the gift to last as long as it could! I gave Cameron this gift two years ago, and he still has two envelopes he hasn't opened. We might be waiting on those two for a while... :)


Have more ideas for what you could write on the envelope? Comment below - I'd love to hear them!


{DIY} Paper Christmas Lights Garland

Is anyone else in denial that Christmas is two weeks away from today?? I can't believe how fast the season has gone by - I don't want it to end! I only finished decorating my apartment this week!!

Every December, I try to make a  new DIY project to add to my apartment decorations. Last year, I made a Christmas tree out of washi tape. This year, I decided on a Paper Christmas Lights Garland.


Once I set my mind to it, it was actually fairly simple to put together. The first few lights took a little while to put together, but soon I was a paper-light-making machine! The tutorial I adapted this project from made this Christmas garland into an advent calendar. Very clever idea, but I was not interested in making 24 paper bulbs...

So I made 12 bulbs and simply used it as a festive garland. I am so happy with how it turned out! Don't get me wrong - the shape of each individual bulb is NOT perfect. But once you take a step back at look at it as a whole, you can't even tell. Don't get frustrated if you are a perfectionist like me!


Tutorial was adapted from The House that Lars Built. I was surprised that I had most of the supplies on hand too! I'm even tempted to take this garland to work to show it off to my coworkers...


DIY Sewn Felt Slippers


I have the cutest niece and I wanted to give her something extra special for Christmas this year. I found a DIY for hand sewn slippers and they looked so cute I had to give them a try! They took a little longer to make than I planned, but they were totally worth it. I can't wait to give them to her on Christmas!

DIY Felt Hand-Sewn Slippers

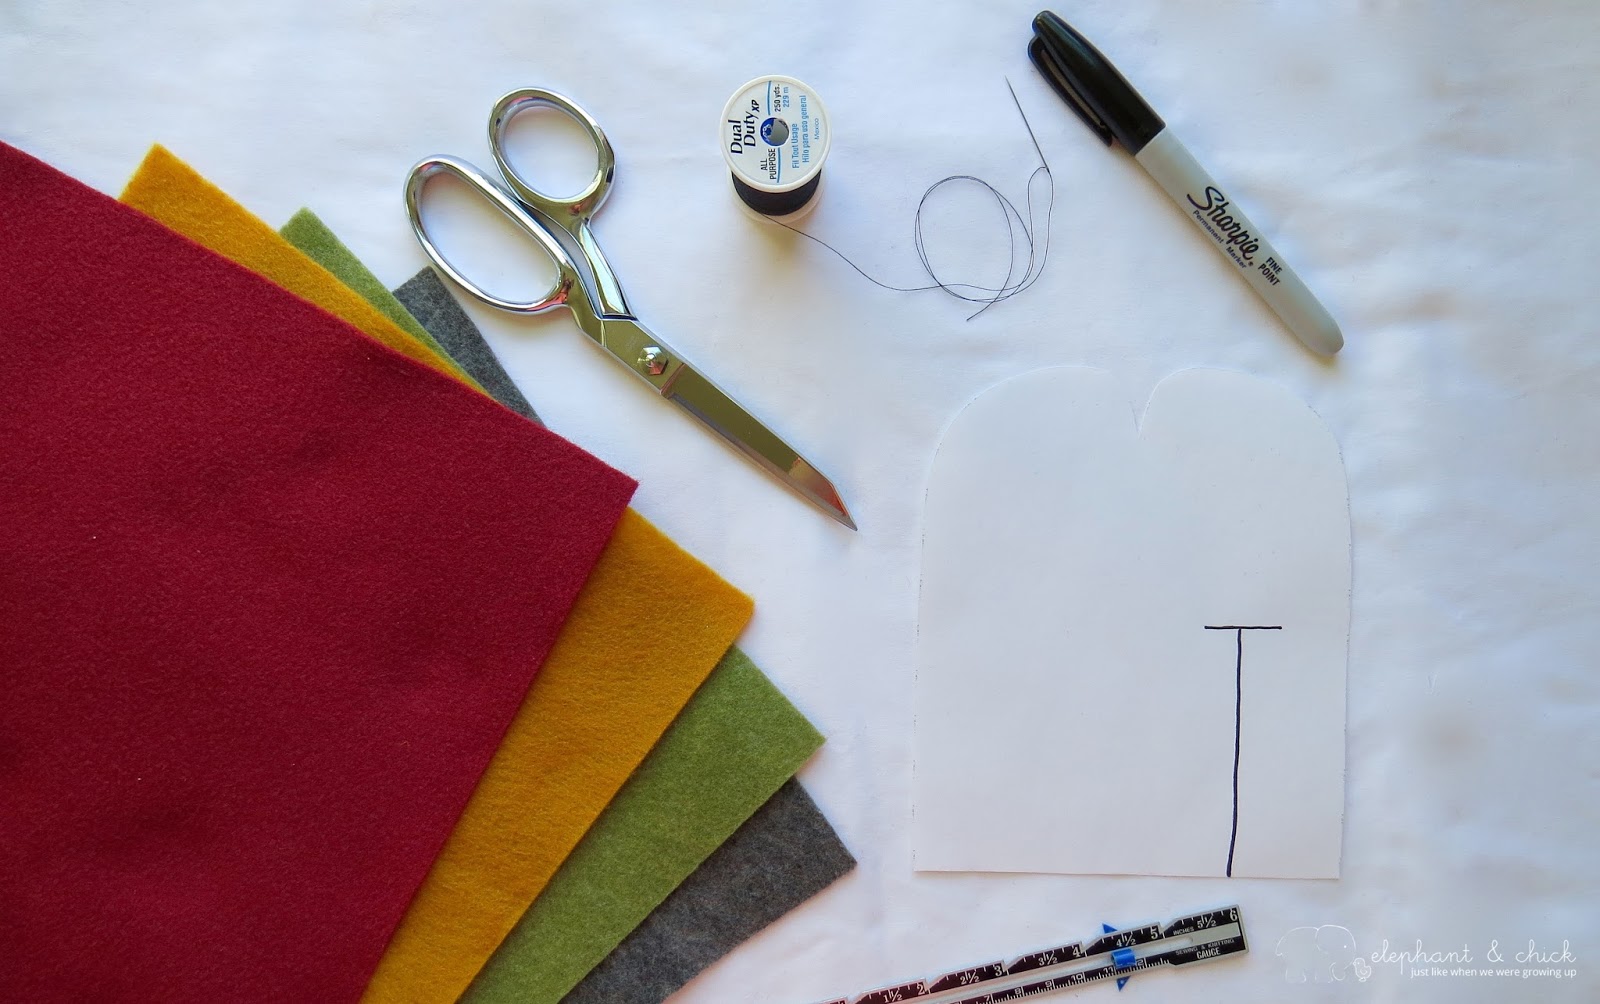
- Piece of felt, whatever color you want
- Chalk pen or pencil (I used a sharpie...)
- Needle and thread


1. Print template. Measure the bottom length of the recipient's flat shoe and cut the template to match. Trace onto felt with chalk pen. Cut out slippers including T-shaped slit.

2. Fold felt in half lengthwise. Thread needle and stitch around the toe leaving the back heel open (left picture below).

3. Pinch heel closed and sew from the top of the heel to the bottom. Leave about 1/2 - 1 inch open at the bottom (right picture below).


4. Now it gets a little tricky. Cut into the felt to create a flap at the heel (about 1/2 inch for smaller sizes, and 1 inch for larger sizes). A flap of fabric should be sticking out. Don't worry - this is correct!

5. Turn slipper inside out.

6. Round off the flap sticking out with scissors. Fold the flap up and sew to the outside of the slipper (right picture below).

7. Fold the cuff over the edge of the slipper and sew to slipper.

8. TIP: When you cut and sew your matching slipper, remember to flip the felt before you sew so the T-shaped slit is on the opposite side (so you end up with a right and a left slipper).


Adapted from Martha Stewart.

Advent Calendar {Party}


This is the second year I've hosted an Advent Calendar Making party, and I have to say it's become one of my favorite activities to kick off the holiday season!  I think it's officially a tradition I want to continue throughout the years.  (I've added an element to it this year though, so keep reading for that part!)

So far I've thrown two different types of parties:

1.  Party for Non-Crafty Friends  
A few key elements:
-  Guests had little or no crafting background or supplies of their own
-  I chose the advent calendar design
-  I provided all the materials, equipment, supplies, and even training on how to make the calendar
-  We all made the same calendar together as I taught and they followed

This party style was perfect for friends who do not usually craft on their own, but are interested in crafting for the sake of being social, or they like the outcome (calendar in this case).  

2.  Party for Crafty Friends
Elements of this party:
-  Guests often craft on their own and have a collection of their own supplies
-   Guests brought supplies to party to offer collaboration
-  I shared a general vision in advance of the party, as well as which supplies and equipment I had available for use, but encouraged guests to brainstorm their own ideas prior to the party
-  We all ended up having quite different visions, and although our calendars have similar elements, they all turned out very unique and personalized.

It's odd to write it all out like that, but I don't see how else to illustrate the differences.  Comparing my experiences this year and last really highlighted the importance of knowing the background and intentions of your guests.  A guest who comes with the intention of catching up with friends is going to have a very different expectation than a guest who comes with the intention of trying new crafting techniques, etc. 

This is one of the calendars a guest created at the party.  This friend is the definition of classy and her calendar does not disappoint!  It is completely classy-dazzled.  It never even crossed my mind to make all of my envelopes out of glitter paper, but why not?  Also, she only made 12 days worth of advent.  With no kids and just herself and her husband, she felt like 12 was a more fitting amount of count-down for them.  So personalized.  This is what I loved about this more free-form style party- I found myself being inspired!   I definitely have my eye on making an all-gold calendar one of these days.


Another calendar from the party, which I'm so sad I don't have pictures of, is Minecraft inspired!  Another child-less couple, these two love their games.  Again, it hadn't ever crossed my mind to make a themed calendar, let alone a game out of it!  I'm excited to hear how it goes for them.

This is the calendar I made, using Stampin' Up's Designer Series Christmas paper set.  I found it so liberating to have more than just red and green in my palette for a Christmas craft.  I chose to highlight a lot of the yellows and blues in my accents with silver tying it all together.  I love how it turned out!


Now, for the element I added this year: I'm going to give the calendar I made away!  My husband and I had so much fun filling the envelopes with Christmas activities specific to the family we've chosen to give it to.  We even included some days that involve us (like "Visit the Quinns for a Christmas treat tonight").  I'm excited to hear how it turns out for them.  I'd love to continue this part of the Advent Calendar tradition in to future years too!  (Below are pictures of candy wrapped up, specific to certain days.  Incidentally, the days that have candy involved are the days that are scripture reading, rather than an activity.  I thought those days needed a little extra something to spice them up.)


Happy Advent Calendar making!


Subway Wall [washi tape]


Visitors always ask the same questions, right?  “What is your favorite thing to do here,” “What foods should we try,” “Where should we try them,” etc.  Living in a destination city and hosting visitors comes with responsibility!  I’ll be the first to say I could definitely spend some more time watching Rick Steves videos and reading Wikipedia in order to enhance my guests’ visits.  Often, they arrive at my home, knowing more about the sites they want to see from their pre-trip research than I do!  That said, they’re always interested in my help exploring this stop on their trip, and I like to do the best I can to accomplish that for them.  It requires a strategy. 

While living in San Francisco, we kept a spreadsheet of our favorite restaurants.  Nerdy, I know, but what else would you expect from two recently graduated accounting majors?  We had it all decked out with categories and filters, which, in our minds, made it super accessible and easy to navigate.  Ha.  Were we wrong.  Maybe to another couple of businesses majors, but it definitely didn’t pan out like we thought.  Even we lost interest in keeping it updated after a while. 

Eventually we moved from San Francisco to Tokyo, another destination city with lots of things to see and food to try.  Rather than start up a new spreadsheet we though, “new city, new method.”  This time we’ve taken a more visual approach: a washi tape rendition of the city!  Rather than a file on the computer, it takes up an entire wall of our guest room! 


In the middle of the wall is the station nearest our house.  From there we drew in the major subway and train lines with washi tape, marking other stations along the way.  Each station has an envelope pinned to the wall, where we collect the business cards, fliers, and tickets from various restaurants and other sites we’ve seen in the city.  Now, when we welcome guests to our home, we have a visually appealing piece of art to show them, helping them get oriented to the city they travelled so far to see, right away!  Plus, at the end of their trip, it's fun to include our visitors in adding to the wall with new places or food we discovered with them.

This could easily be applied to any city.  With the purpose of visitors in mind or not, it’s an interactive way to document your time in a city, similar to a scrapbook or a home video.  Mark the major neighborhoods around your house, where you spend your time, and start filling up those envelopes!


DIY Baby Owl Costume


Today I am sharing the DIY Baby Owl Costume I made for Penelope last year for Halloween.  My sister Genevieve was in town visiting and we were able to whip it out during one of her naps!

This is a very easy and inexpensive costume to make! But don't let that fool you - hello adorable! 

What you will need:
1.  Three different kinds of felt.  I used dark purple, grey and light pink.
2. Owl feather template. I just started drawing triangles until I came up with a shape I liked. 
3. Pencils and scissors.  Trace and cut out the feathers. 
4. Pins, a sewing needle, and thread.  Used to pin and sew on the feathers.
5. A shirt of your choice to sew the feathers onto. I used a 6-month sized onesie
6. Pants. I choose grey pants to coordinate with the feathers.
7. An owl hat. My mom made Penelope's hat following an Etsy template I purchased.  Find a similar template here.    

Step by step Instructions: 

1. Make your feather template and begin tracing your feathers on desired felt. Continue cutting out feathers and laying them on your shirt till you achieve desired look.  I choose three different kinds of felt and cut 18 grey feathers, 13 purple feathers, & 15 light pink feathers.  


Face-timing with "Nannie Shannie" and Tagg in San Francisco. 
2. Place feathers on desired shirt alternating colors randomly.  Start from the waits and work your way to the top of the shirt.  Be sure to measure where your child's waist hits and start the feathers right above where their pants meet their shirt.  See below.   

One tip is to add in a little "bend" to the rows of feathers and not make strict rows.  You want the feathers to look natural, not laid out. 

3. Hand sew on feathers.  


The finished product!  Viola!


Penelope modeling on halloween.   


She learned how to sit up a week before these pictures were taken - perfect timing!


Pin Strip: