Showing posts with label food. Show all posts

Feeding the Masses {Menus for a Weekend of Meals}


This past weekend we had Stake Conference.  Our Stake President was recently called to be a Mission President, so a new Stake Presidency was in short order around here.  This only comes around every 10 years, so excitement has been building for months.

Two weeks prior to the conference, I was asked to provide some meals on the weekend of with the intent to feed the visiting Authorities.  Having watched my Mom, aunts, and other inspiring women feed masses over the years, I agreed with no hesitation.  Bring it on, I thought.  

Until I tried to come up with the menu. 

Total mind blank.  Nothing.  Have I never cooked a meal before in my life, I thought?  Some unique factors were blinding my vision: must be transportable from my house to the church or church office buildings via stroller or walking, no crockpot available or oven to cook anything larger than an 8x8 pan, must be delicious to a wide range of palates, must be "simple," yet beautiful enough to serve to leaders of my faith!  Oh, and all while working within the confines of Japanese grocery stores and import goods. 

Maybe these set of circumstances are unique to me.  Maybe not, however.  In the event that any of your are ever asked to come up with beautiful meals on short notice, I'm providing my menus and notes here.  You're welcome!  I hope they save you the struggle I went through.  You'll notice I'm not including many recipes.  The recipes aren't complex by any means.  It was the compilation of three beautiful, simple, delicious, flexible, transportable meals that I found to be the challenge.  

Lunch:
Fruit Skewers
Potato Salad
Cookies
Lemonade

Notes: The details on this lunch are what made it beautiful.  We plated the food, rather than having the guests serve themselves.  This gave us the opportunity to arrange the food aesthetically on the plates.  Serving sandwiches on croissants rather than bread, skewering the fruit rather than chopping, adding a sprig of parsley to the perfectly scooped potato salad: These small details allowed us to get away with serving an otherwise simple meal.  

Dinner:
Lasagne
Green Salad and Dressing
Garlic Bread
Chocolate Cake

Notes: For dinner our intent was to serve a filling, quick meal.  The Authorities needed to eat between sessions, so their time was limited.  Lasagne is easy to make at home, even easier to buy, and scales well, especially when paired with a generous loaf of garlicky bread and a green salad packed with veggies.  We plated the food for this meal also, minimizing the risk of spilling red sauce for our guests.  The cake was plated and ready at each setting, giving the guests warning to save room for the sweets!  (**If you don't already have a go-to lasagne recipe, feel free to email me and I'll share mine!)

Dinner:
Creamy Italian Mushroom Chicken
Rice
Fruit Jello Salad
Homemade Rolls and Honey Butter
Green Salad with Various Dressings
Sheet Cheesecake with Cherry Topping

Notes: This was our largest meal of the weekend - feeding both the new and old presidencies, their families, and the Authorities.  We were instructed to serve it immediately following the Sunday session of Conference, so they could eat before starting training meetings for the remainder of the day.  I opted to call in a crockpot for this one.  We cooked the chicken and rice both at the church during conference which eliminated the struggle of transporting warm food, keeping it warm, and the time crunch.  We used the salad from the night before, adding to it to account for the increase in numbers.  The cheesecake was simple to make, simple to serve, but delicious.  

Lastly, don't forget the table clothes and flowers!

Now, if you'll excuse me... I'm going to go store these somewhere safe for the next 10 years...


The Best {and Easiest!} Homemade Egg Rolls

{photos courtesy of Robyn's Nest Photography}

Hello! Shannon, here. I'm the sister that lives in San Francisco (the best city, in my opinion). Thanks for stopping by our little piece of the internet. I have been DYING to share this recipe with you guys, and today is finally the day!

Last December, my husband and I visited Phuket, Thailand. While we were there, we thought it'd be fun to learn how to make authentic Thai food, so we signed up for a Thai Cooking Class.

We learned how to make 5 different Thai dishes, and learned two very important things:

1. Thai food is delicious.
2. Thai food is SUPER EASY to make.


Egg rolls quickly become one of my favorite foods. They are my weakness! Not only are they delicious, they're fun to make too. I re-made these egg rolls with my family over the holidays, and we had just as much fun assembling the rolls as we did eating them.


Egg rolls might sound intimidating, but trust me - you'll be surprised at how straight forward they are to make, and how much fun you'll have doing it! I've included a step-by-step photo process of how to roll your egg rolls to help you out.


First, make the filling (scroll to the bottom of the post for the recipe). Then, spoon a little bit of the filling just off center of the wrapper towards the bottom corner (pictured below).

Gently roll the corner of the wrapper to cover the filling, and tuck the corner under the filling.

Roll until you are just less than halfway up the wrapper. Fold the right corner over to the middle of the wrapper.

Fold the left corner over as well.

Continue rolling the wrapper until you have about 1 inch left on the top corner.


Spread a little bit of a beaten egg on the last corner, and finish rolling. The egg acts as a glue to keep the egg roll together.

Voila! Time to fry them!

It might take you a couple rolls to get the hang of it, but soon you'll be an Egg-Rolling Master! Once they've cooled a bit, I like to dip my finished egg rolls in Sweet Chili Sauce.

{photos courtesy of Robyn's Nest Photography}

The Best {and Easiest!} Homemade Egg Rolls
Makes about 25 rolls

INGREDIENTS
4 oz mung bean noodles (I used thin rice noodles instead)
1/2 cup finely sliced cabbage
1/2 cup finely diced carrots
1 cup chopped chicken or pork
1 egg
1 tablespoon chopped garlic
1/2 tablespoon ground pepper
2 tablespoons fish sauce (or soy sauce)
1 tablespoon sugar
3 cups cooking oil (for frying)

INSTRUCTIONS
For the filling...
1. Soak noodles in hot water until soft (follow the directions on the package for more detailed instructions). Then cut into short lengths so the noodles are about 1 inch long.
2. Boil cabbage and carrots until soft. Drain, and try to squeeze out as much moisture as you can. Set aside.
3. In a wok, heat some oil. Add garlic. Then add chicken and cook until no longer pink. 
4. Mix in cabbage and carrot mixture, egg, pepper, fish sauce, sugar, and noodles. Mix until combined (this shouldn't take very long - maybe like 30 seconds).

To assemble...
1. Roll egg rolls (follow my step-by-step guide above!).
2. Heat oil until hot. Deep fry egg rolls until golden brown (only a few at a time - don't overcrowd the pan!). Remember - everything inside the egg roll is cooked already, so you're mostly looking for a crisp, golden brown outside.

Serve with sweet chili sauce, soy sauce, or your favorite Asian dipping sauce.


What do you think? Sounds easy enough, right?


For more Asian inspired dishes, try:


Cake-in-a Mug {Round-Up}

For those of you just tuning in, I live in Tokyo, where baking is not a common pastime for anyone other than a professional baker... which means there are literally NO OVENS in Japanese kitchens.  Can you even fathom that?  Thankfully, there are companies that rent mini convection/microwave ovens, mostly for foreigners like myself, who can't live without.  With that being the case, I've had to make some adjustments in my baking habits, resulting in the only logical side effect: multiple pin boards.

One of my boards is dedicated to single-serving recipes, to accommodate for the small size of the oven.  (Another is dedicated to dessert that bypass baking altogether, but that's another post for another day.)  While searching for single-serving recipes, I came across the concept of baking in a mug.  Not only is it brilliant, functional, and portion-controlled, it's adorable and totally customizable as a gift!

Here are a few of the favorite recipes and packaging that I've seen:

The 60 second chocolate chip cookie in a mug + a scoop of ice cream = the perfect instant pazookie
Another one minute treat: chocolate peanut butter cake.  Seriously?  Why have I not made this yet?
To be honest though... I'll take a brownie over a chocolate cake any day
The trendy salted caramel cake, of course.  Love this dichotomy in flavors.  Maybe there's a maple bacon recipe out there...
This one's for my brother: the Snickerdoodle fanatic
And mac n cheese!  Could this really possibly be the easiest toddler lunch ever?  (Slash comfort food for me)

Enjoy!


Oatmeal Banana Chocolate Chip Cookies


I always see the cutest pictures of my friends making cookie with their little ones - babies covered in flour with a wooden spoon in their hand.  You know what I'm talking about.  I decided to "make cookies" with my little one for the first time this week.  This is about how it went:

"Baby, do you want to make cookies with me?"

"Cookie!!"

"Ok, let's get your chair, come sit in your chair and you can help me."

"Cookie!!"

"Well, no, I don't have a cookie for you right now.  We're going to make cookies."

"Cookie!!"

Did I mention he recently learned to say "cookie?"  Oh, and his pronunciation of the word includes yelling it at the top of his lungs.  It was a good lesson in patience.  


Oatmeal Banana Chocolate Chip Cookies


1 square butter (or margarine)
1 1/2 cups sugar
2 eggs
2 cups ripe bananas (mashed)
3 cups flour
1 tsp. salt
2 tsp. cinnamon
1 tsp. soda
2 1/2 cups oatmeal
Mini chocolate chips as desired

Bake at 375 degrees Farenheit for 8-10 minutes.


Pumpkin Cream Cheese Fruit Dip

I love baking with pumpkin.  You know how pumpkin comes in those huge cans and it's virtually impossible to use it all up in one recipe?  Secretly, it doesn't bother me, because I love having a reason to use lots of it as I bake in the Fall.   I noticed the other day that those cans are sized to make two 9" pies.  Well, I never actually make pies with my pumpkin, which means that during the Fall months I usually have a partially used container of pumpkin in my fridge at all times.  

If this sounds familiar to you, it's time to open that next can of pumpkin (or use the one you've already started that sitting in the fridge) and make this dip.  It is delicious.  Warning - the proportions I'm going to list below make a very large batch.  Because of that, we've been eating it all week, which has lead to eating it with other foods than just fruit - like a spread for pancakes.  Delicious!  The options are endless.  Whip up a batch for your family or the Fall party you're attending.  It's sure to be a hit without taking up a ton of your time to make.

Pumpkin Cream Cheese Fruit Dip

2 (8 ounce) packages cream cheese
1/4 cup butter, softened
2 cups powdered sugar
3 Tablespoons brown sugar
3/4 cup pumpkin puree
1 teaspoon cinnamon
1 teaspoon nutmeg
1 teaspoon ginger

Blend cream cheese and butter together until light and fluffy.  
Add powdered sugar and brown sugar and blend well.  
Add pumpkin puree and spices until combined.

Serve with graham crackers, gingersnaps, and fruit for dipping

Small tip: presentation is key when you take a food like this to a potluck party.  My advice: put the time you're saving with this treat in to making the presentation a little better than you normally would.  Cookies are easy, right?  Stack them on a plate, everyone recognizes them for the dessert they are, and they're gone by the end of the party.  Dip, turns out, is a little more tricky to make appear appetizing.  I didn't find these adorable cups until after our neighborhood get-together, which means I took the dip to the party in a bowl, with the fruit in a separate bowl.  I knew we were in trouble when the first comment was, "is that hummus?"  No... no it's not.  Good luck explaining that one.


Pumpkin Waffles with Apple Cinnamon Syrup


Have you ever met someone who doesn't like pumpkin? It almost sounds impossible, right? My husband is one of those peoples (in full disclosure, I was not aware of this before we got married...). Every year when fall rolls around, I tell him all about these delicious pumpkin recipes I've found on Pinterest, but he never changes his mind. The rule is he will only eat one pumpkin flavored thing every year.

Needless to say, I've learned to choose my one allotted pumpkin recipe wisely.

Last week, I made these pumpkin waffles for breakfast and he loved them! They have a subtle pumpkin flavor and pair nicely with a homemade apple cinnamon syrup (don't you dare cut this from the menu!). My husband liked these so much that he said he wouldn't mind eating them again in a few weeks. Pumpkin recipe success!

Now you need to try them for yourself and let me know what you think. (Be sure to check out a roundup of some of our all time favorite pumpkin recipes here).


Pumpkin Waffles with Apple Cinnamon Syrup
Makes about 6
Ingredients
2 1/2 cups flour
4 t. baking powder
2 t. ground cinnamon
1 t. ground allspice
1 t. ground ginger
1/2 t. salt
1/4 cup brown sugar, packed
1 cup canned pumpkin
2 cups milk
4 eggs, separated
1/4 cup butter, melted
Syrup
1/4 cup white sugar
1/2 T. cornstarch
1 t. ground cinnamon
1 cup apple cider
1 T. lemon juice

Directions
1. Preheat waffle iron while you make the batter.
2. In a large bowl, combine the flour, baking powder, cinnamon, allspice, ginger, salt, and brown sugar. In a separate medium bowl, whisk together the pumpkin, milk, and egg yolks.
3. Using a hand-mixer or Kitchen-aid, whip the egg whites until soft peaks form.
3. Stir the pumpkin mixture and the melted butter into the flour mixture. Using a spatula, fold the egg whites into the batter (fold in half of the egg whites, then add the remaining half).
4. Cook waffles according to your machine's instructions.
5. APPLE CINNAMON SYRUP: In a small saucepan, stir together the sugar, cornstarch, and cinnamon. Stir in apple cider and lemon juice. Cook over medium heat until syrup begins to boil. Continue boiling until it thickens. Remove from heat and serve warm.


Recipe adapted from allrecipies.com

Apple Cinnamon Granola


I think granola has to be one of the most underestimated homemade specialties out there.  It's so easy, so customizable, and so delicious.  In the spirit of it being Fall and whatnot, I bring you apple cinnamon granola.  But think about it - what if you substituted the apples for dried bananas?  And added chocolate chunks?  How about dried bananas AND dried strawberries in your granola! Or coconut is one of my favorite granola add-ons and always a good choice.  The options are limitless.  

Other reasons to make homemade granola:

- You don't like the unnatural preservatives in boxed cereal.

- You live in a country that doesn't sell your favorite American boxed cereals.

- You or your kiddos have special dietary restrictions that mean you get a headache every time you try to read the fine print ingredients on said box of cereal.

Try making homemade granola.  I dare you.

This recipe involves coconut oil, which is a favorite and a staple around our house.  I love the slight coconut flavor it gives to the mix, without being too overbearing.  My recipe below lists approximately 3 times the amount of cinnamon a regular person might feel comfortable with, but feel free to add more.  I won't judge.

Apple Cinnamon Granola

3 cups oats
1 cup of dried apples
2/3 cup honey
2 tablespoons coconut oil, melted
1/2 teaspoon vanilla
3 teaspoons cinnamon
1/4 teaspoon salt

Preheat oven to 300 degrees Fahrenheit.

Mix all ingredients together.  Spread thinly on a cookie sheet and bake for 20 minutes.  Stir and then bake for another 20 minutes.

Note: If you've never dried apples before, I suggest you add that to your favorite snacks as well.  Our Best Bites has a great tutorial here. 


{Homemade} Fortune Cookies


Did you know - September 13 is National Fortune Cookie Day? Did you also know that although fortune cookies are served at most Chinese restaurant, the fortune cookie didn't originate in China? The cookies are actually a spin off of a traditional Japanese cookie: tsujiura senbei. The exact origin is unclear, but many people say that Californians popularized the cookie in the early 20th century. In any event, I think this statement pretty much sums up fortune cookies: "Introduced by the Japanese, popularized by the Chinese, but ultimately...consumed by Americans."


A few months ago, I found out you could actually make your own fortune cookies. I had no idea! I found a recipe over on The Semisweet Sisters, and couldn't wait to give it a try. The folding is a little tricky at first, but once you have that figured out, the cookies are a breeze to make! The hardest part for me was coming up with unique/funny/meaningful fortunes. (Scroll to the bottom to see a few that I ended up using).

You'll start by making the batter and baking the cookies. Once they come out of the oven (nice and golden brown), you'll place your folded fortune on to ready to be folded inside. Tip: you have to fold these cookies when they are hot out of the oven. They cool and harden within minutes so time is of the essence. I recruited my husband to help fold so I'd have an extra set of hands.


Fold your cookie in half with a spatula, and then using your thumb and forefingers, bend the cookie over the rim of a mug. Tip: let the cookies cool in a cupcake tin. This will help them keep their shape as they harden. You've got to try making these at least once - it was so rewarding knowing I actually made fortune cookies! Tip: check out this video for tips on folding the cookies.


Homemade Fortune Cookies
makes 18
Ingredients
1/2 cup flour
1/2 cup sugar
1 1/2 t. corn starch
pinch of salt
2 egg whites
1/2 t. vanilla
3 T. vegetable oil
3 t. water

Directions
1. Preheat oven to 350 degrees. Prepare baking sheets by lining with parchment paper or silicone baking mat.
2. In a medium bowl, whisk together flour, sugar, corn starch, and salt. Set aside.
3. In a separate bowl, whisk egg whites until frothy (whites will become foamy). Whisk in vanilla, oil, and water. Add egg mixture to dry ingredients and mix until smooth.
4. Spoon tablespoons of batter on to baking sheet. Spread batter out with the back of a spoon to form a small 3.5-inch circle. Tip: only bake 3-4 cookies at a time so you'll have plenty of time to fold them while they're hot.
5. Bake for 8-10 minutes, or until edges become golden brown.
6. Remove cookies from oven and flip over with spatula. Place folded fortune in the middle. Fold cookie in half using the spatula. Pick up the cookie (warning: cookies will be SUPER HOT!) and fold the ends over the rim of a mug (think: keep the seam towards the ceiling as you fold the ends to meet each other).
7. Let the folded cookies cool in the crevices of a cupcake tin. Let cool for 5-10 minutes.

Recipe adapted from The Semisweet Sisters.

Here are some fortunes I used in my cookies:
- A good way to keep healthy is to eat more Chinese food.
- Sometimes you just need to lay on the floor.
- It never pays to kick a skunk.
- Watch a sunrise at least once a day. (Phil Dunphy)
- You will live a long life and eat many fortune cookies.
- Surround yourself with pizza, not negativity.
- Before trying to please others, think of what makes you happy.


Homemade Dinner Rolls


Fall is finally here folks. Can you believe it?! Whenever I look at my calendar, I'm always surprised that we're already in September.

One of my favorite things about Fall is a nice warm bowl of soup. I like recipes that require minimal assembly up front, cook for a few hours, and then produce absolute deliciousness for dinner. Soup is a nice option for dinner because you can usually make a large pot of it, and then eat leftovers during the week or freeze some for later. Here are some of my family's personal favorites: Italian Orzo Spinach Soup, Chicken Corn Chowder, and Vegetable Chili. 

Let's be honest though. What does every good soup need? A nice fluffy roll to go with it. It's like peanut butter and jelly, mac and cheese, corn and the cob (okay maybe that was a little bit of stretch). I shared one of my tried and true crescent roll recipe last Thanksgiving, but today I want to share a simple dinner roll recipe. You should know going in to it that it's one of those recipes that requires two separate rising periods, but they are both only 20 minutes long so it goes by quickly as you're preparing the rest of your meal. (I tried freezing half of my rolls too - I'll let you know how that turns out when I pull them out in a couple weeks).

What's your favorite part about Fall?


Homemade Dinner Rolls
Makes 12 rolls
2 cups flour, divided
1/2 T. yeast
1 T. sugar
1/2 t. salt
3/4 cup buttermilk
1 T. butter, at room temperature
1 T. butter, melted
sea salt
1. In a large mixer bowl, combine 1 cup flour, yeast, sugar, and salt. Mix on low speed until combined. In a microwave-safe bowl, heat buttermilk for 45 seconds until very warm. Add warm buttermilk and softened butter to flour mixture and mix. Add remaining cup of flour and mix until well incorporated.

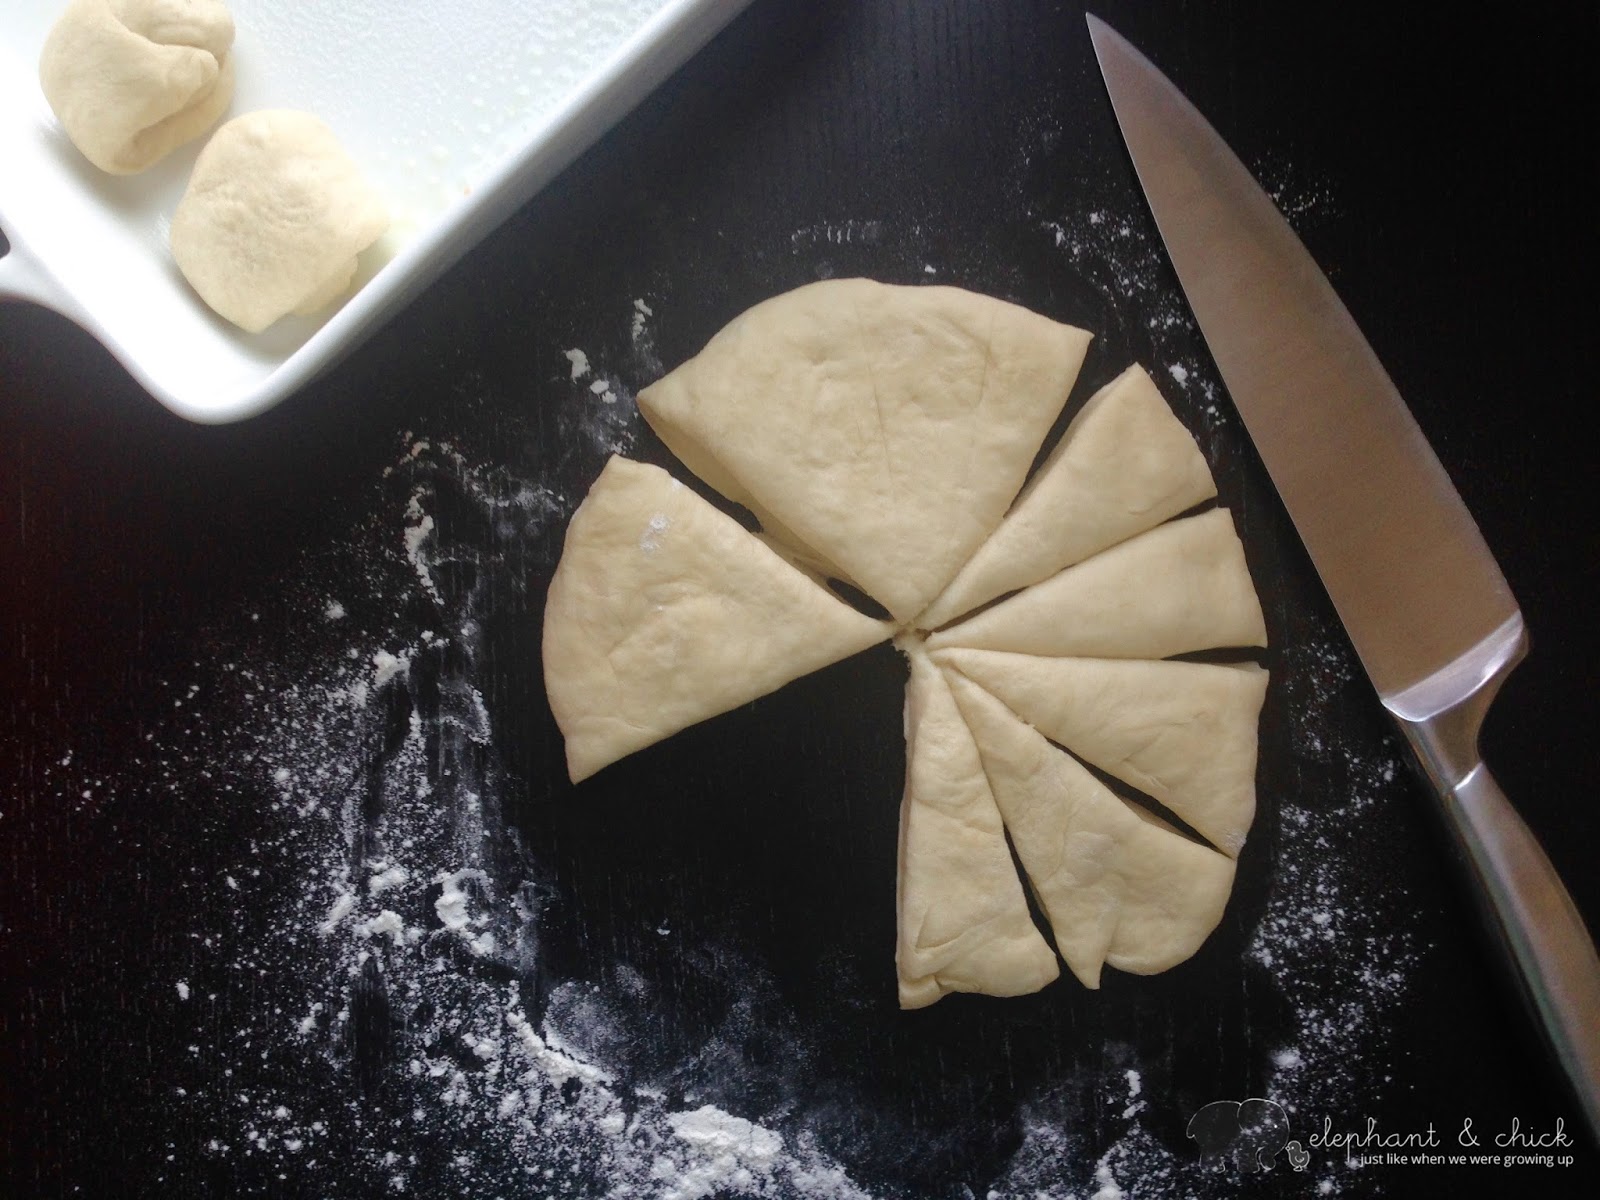
2. Switch out the beater for a dough hook. Knead dough for 5 minutes until smooth. Coat a medium bowl with cooking spray and transfer the kneaded dough to the bowl. Cover with plastic and let dough rise until doubled in size (about 20 minutes). Spray an 8-inch baking dish with nonstick spray. Turn out dough onto a lightly floured surface. Shape dough into a ball and use a sharp knife to cut into 12 equal portions (see picture above).

3. Use lightly floured hands to roll each piece into a ball. Place rolls in square baking dish. Cover with plastic and let rise for another 20 minutes. Preheat oven to 400 degrees F while rolls rise. Using a pastry brush, lightly brush rolls with 1/2 tablespoon melted butter. Bake rolls for 14 minutes (or until golden). Immediately brush rolls with remaining melted butter once removed from oven. Sprinkle rolls with sea salt and serve warm.
Adapted from Tutti-dolci


Pulled Pork Pizza + Hawaiian Pizza {Homemade Style}

When Andrew and I first moved to San Antonio we were friendless, like you are when you move to a new place (womp, womp).  A friend from our old neighborhood in Pittsburgh found out where we were moving to in San Antonio and hooked us up with his Brother and Sister-in-law that live in the area.  After moving in the first week we made plans to go over to their house and have dinner.  It was a forced playdate if you will.... haha (emoji crying your eyes out you're laughing so hard).  

Dinner ended up being a huge success and we quickly fell in love with this family.  They also introduced us to a food group we will forever be indebted to them for:  Texas BBQ; specifically, Rudy's.   


Penelope (1 month) and Tagg (3 months) on their first trip to Rudy's when Lauren came to meet Penelope 
If you've come to visit us here in SA, chances are we've taken you to this tasty little joint several times and you request it every time you come to visit hereafter.  

Fast forward a year and a half to this past 4th of July.  This "forced friendship" has blossomed into some of our greatest friends.  We are over at their house for the holiday and decide to have BBQ to celebrate the holiday. I can't think of a more patriotic way to celebrate can you?  After all BBQ is what you eat in Texas... 

After wrapping up dinner and leaving before the fireworks (because we're lame like that now and have a baby that needs to go to sleep at the same time every night regardless if it is a holiday or not) our friends handed us a huge ziplock bag of pulled pork. Score! 
On the way home Andrew and I were listing all the countless things we could do with the pulled pork.  Seeing as the 4th of July was on a Saturday this year, and on Sunday's we do Sunday Pizza Night, it only seemed obvious what we would do with the pork. Make a pizza!!!!  


Yes, it is even better then it sounds.  What you will need is: 


 My favorite pizza dough (you can see the recipe in this post), barbecue sauce 


and don't forget your mozzarella cheese.  


Now, for the pièce de résistance...the pulled pork.  


When it comes out of the oven be sure to top if off with some cilantro.  
------

p.s. Another one of our favorite pizza's on this amazing stone is Hawaiian Pizza.  


We like to brown the ham in a pan before putting in on the pizza, and of course use fresh pineapple, as opposed to caned pineapple.  


Bon Appétit!